How to clean up your image background ~
Wow. I haven't done a journal in ages. I thought I would share a little trick for getting a nice clean background when you want to isolate a structure in Mandelbulb 3D. Why? Because sometimes the structures behind the main focus of your image or the main structure are either just small repeats of the main structure, or they are fragmented and in one way or another just not as interesting. Or the background might bury the foreground object in detail or draw attention away from what you really want the viewer to focus on. People strive for a lot of detail, and that's fine, and sometimes it works. But often I find that there's no main focus to frame your point of view. (Edit: I forgot to mention this is made using Mandelbulb 3D version 1.8.2 and I fixed a few typo's!)
Sometimes you're able to focus on the foreground structure through clever use of fog, lights and depth of field settings. Nothing wrong with that either, so this is just another way to pick an object and isolate it by itself and keep a good clean image. I decided to use the image I posted yesterday (
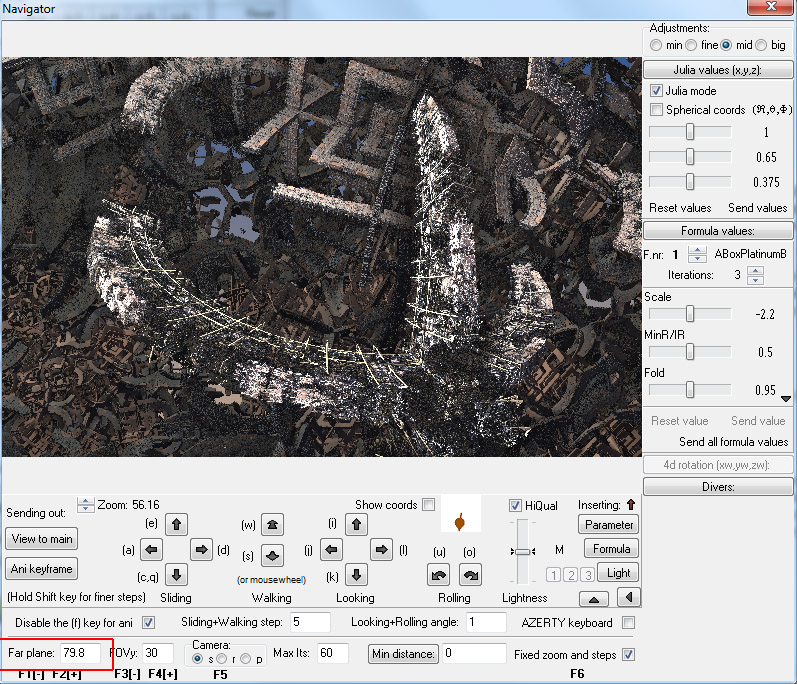
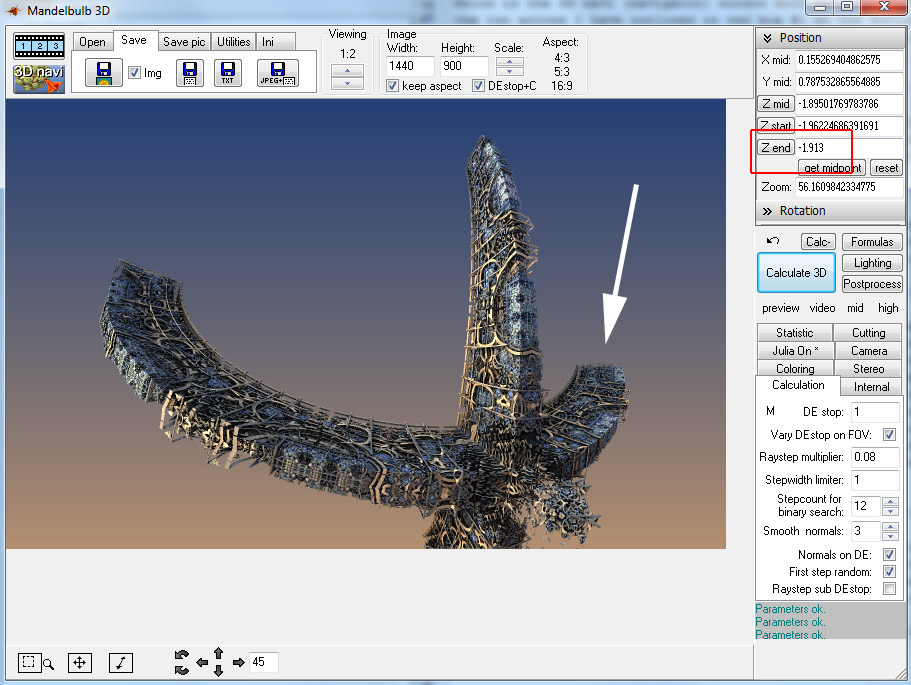
Shields Up) as a reference image as I used this technique to isolate the main shape. Below is an image in the main window similar to how I found the shape I was interested in for this demonstration. There's a shape outlined in white in the center area I liked and wanted to isolate. Out lined in red on the right is one of the settings we'll be adjusting later. (Parameters are included at the end of this journal if you want to follow along!
 (Smile)")
)
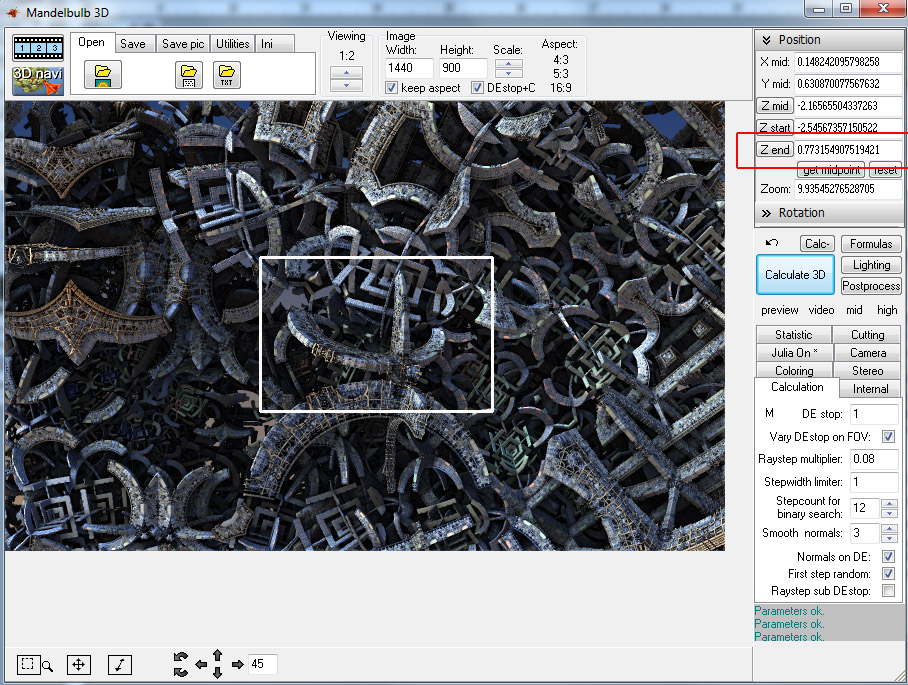
Below is the 3d navi (navigator) window with settings we'll adjust outlined in red. If your navi window looks different, you need to expand the extra tools setting by clicking the two arrows I have outlined in red box #1 at the bottom right. On the bottom left is the far plane setting, red box #2 which we will be adjusting. The first thing I do when I find an interesting structure I want to focus on is to zoom in, rotate and center it the way I want. I already have it rotated and centered for a decent view as this is from existing parameters, so now I'll just get us zoomed in.
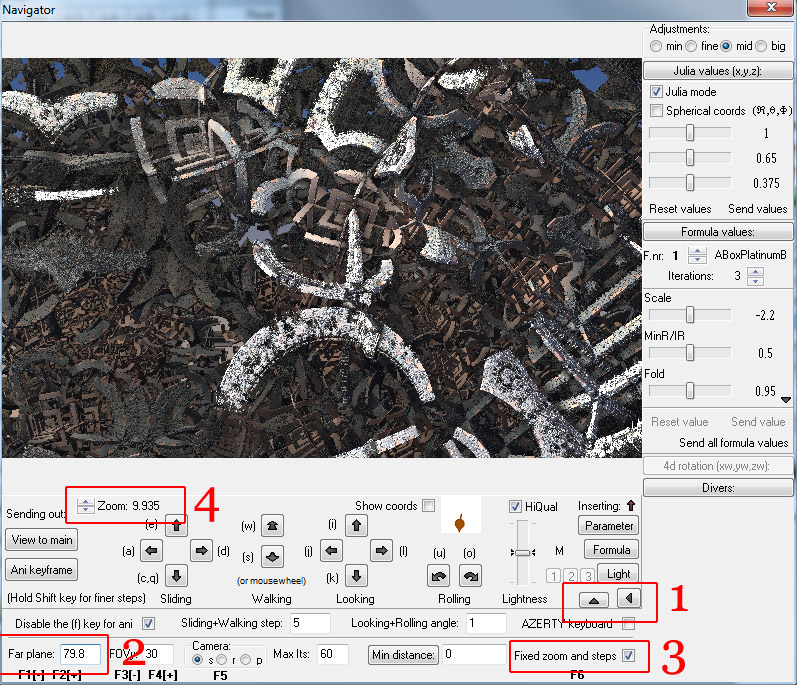
Sometimes zooming alone will clear the background some. So with fixed zoom and steps selected (see image above, red box #3) I clicked the top zoom button (see image above, red box #4) 5 times. As you can see in the below image, the zoom changed from around 10 to just over 56. Now the structure I like is centered and just about fills the screen. As you can see, this time, zooming did not clear up the background at all. Notice that the far plane setting is at 79.8. Now we can start the isolation process.
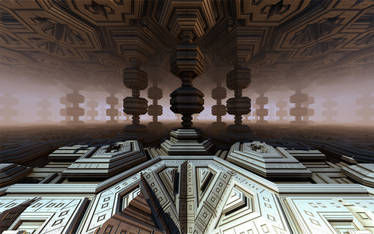
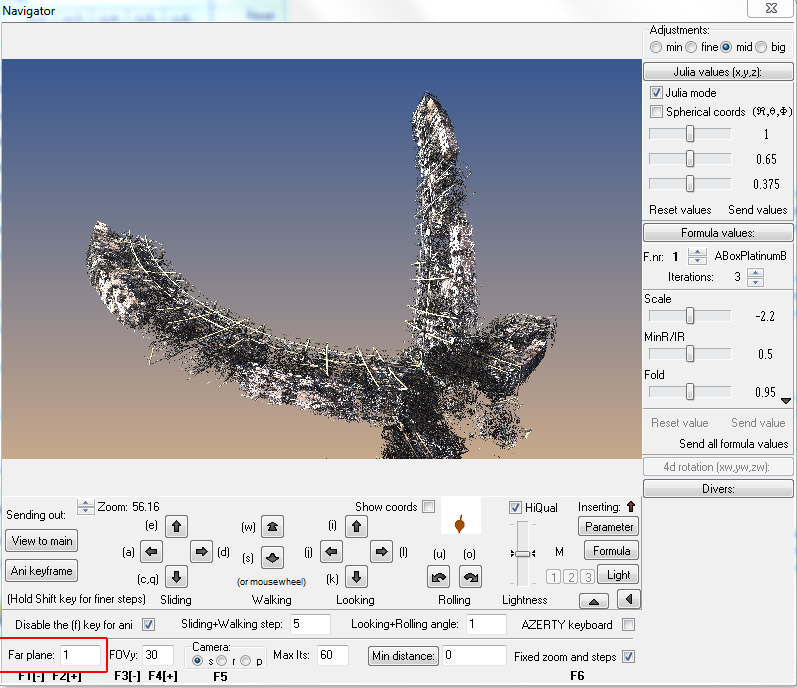
First thing we do is change the far plane setting. I usually go right down to 1. Sometimes the entire image disappears in the navi window and you have to try 2 or 5 or 10. But this time 1 worked perfect. As you can see below, the structure I was interested in is perfectly isolated. Groovy! Now let's load that puppy into the main window. Click the 'View to main' on the left of the 3d navi window and then click Calculate 3D in the main window.
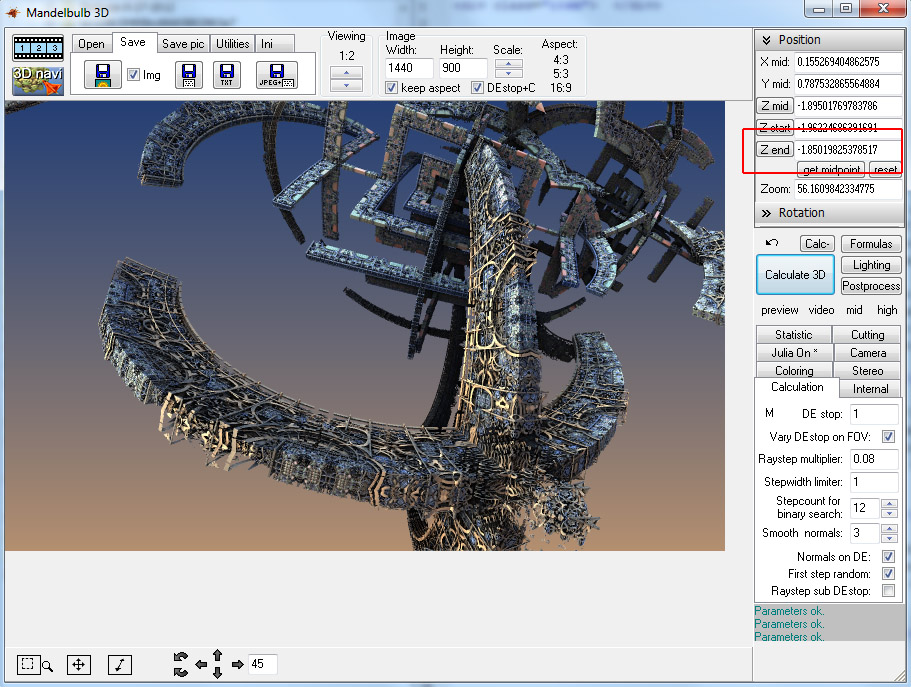
Look below. Shit the bed. What the hell happened in the main window? Welcome to Mandelbulb 3d! This is a standard result when loading an image from the navi window to the main window. Things aren't always this different, but often are when you start messing with the far plane settings. I can't explain the technical reasons, because I'm not a tech expert in MB3D. And the funny thing is, if you now reload the image from your main window into the navi window, then the images will match again, but the far plane resets to 2.7. Anyway, as you can see, we need to clear up the background more, and get rid of the un-interesting clutter. We do this with the Zend setting.
In your main window, make sure the Position tab at the top right is selected and you will see the Zend setting I have outlined in red. Here it is set to -1.85019825378516. Big number! As I've said in previous tutorials, many times you can get rid of a lot of the decimal places and it won't effect the image. For the most part this is true, however it may depend on how far you are zoomed into an image. If you are zoomed way in, a small change can shift the image a lot. At the zoom factor we are at, this will not be an issue. So to start I'm going to get rid of all but two decimal places and that leaves us with -1.85 for the Zend setting. There is no visible change in the image. This is an arbitrary decision and may or may not work with other images, you may have to leave three or four decimal places, but the overall process is the same. We are adjusting the Zend, and what that is actually doing is cutting the image from the back.
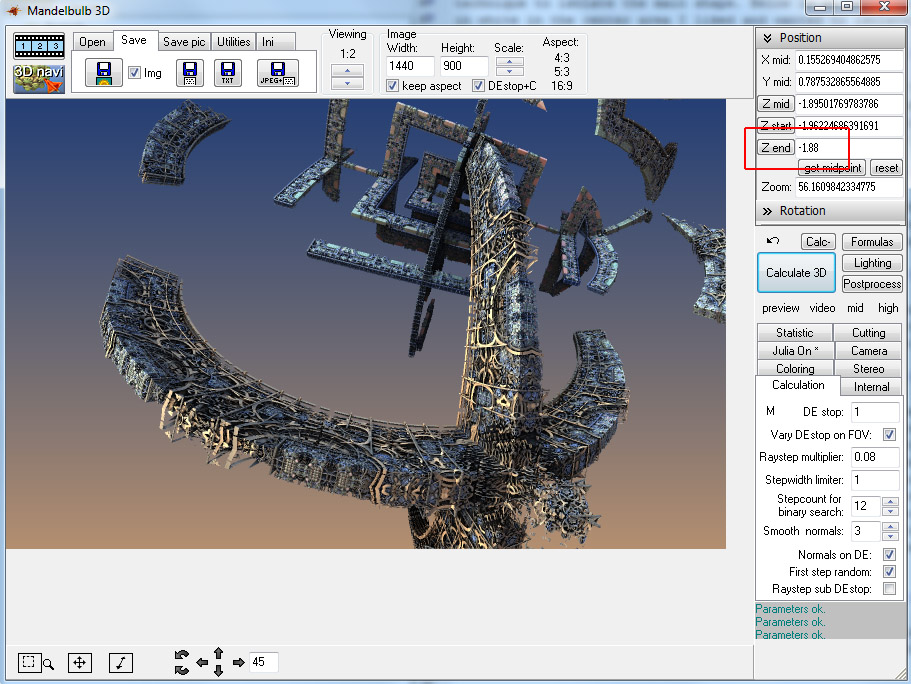
You need to be patient here and go in little steps. But let's say you are me and not patient at all. Let's set the Zend to -2. Boom, all gone. I only changed the Zend 15 hundredths and the image is gone. So let's not be me, and just try changing it from -1.85 to -1.88. That's better! Only a -0.03 change and half the background clutter is gone. Through this trial and error process, you can usually clean all the clutter that is behind the structure you are focusing on. This will not remove clutter that is adjacent to your structure or other wise on the same plane, only clutter behind it!
And here is the final setting I ended up with. The Zend is set to -1.913 and all of the background clutter is gone. Also if you notice, part of the right wing tip has been cut as indicated by the arrow. This is not an obvious flaw as it wouldn't be noticed if you hadn't seen the original before cutting. It bothered me at first, and I tried rotating the structure to get the wing tip back, but then I lost the profile of the upper sail which I liked. And also be warned, if you reload this image from your main window into the navi window to rotate, zoom or otherwise edit the image further, you will have to go through the entire Zend cutting process all over again. You can however do some zooms and moving in the main window. If you want to zoom, just do it manually by inputting new zoom values in the zoom box. You can recenter the image with the move tool.
And there you have it. I hope someone gets some use out of this little process for isolating structures. Here are the parameters for the image if you want to follow along with the process:
Mandelbulb3Dv18{
b.....h...Uk/...w....2A...UM.xj48q3/.rQBFlpfxWyD/X.fIXNy0znrlKSQK.1tzssbBCjEH3.k
................................aWvAeCjrX.2........Y./..................y.2...wD
...Uz......3..../M.1/.....kh....P0....E3.....os5eQi1CCnD/..........m/dkpXm1.....
z.U0LDOD12../2.........wzoAnAnAnAHyD........Mz1..........o.u1....y1...sD...../..
.z1...sD1ovy9KAXnwn6ew0BugNly8jpmti1wchjkha43SjJiuXPRmYWhmCAzO9fqAkGLCmDKJQtmGU5
QvfHeP9rXOt6zmaoKPjPf1nj......2p..............sD.6....sD..E.....................
.............oAnAt1...sD....z.rbn9.2UCj.k0uw0.Jcn9.wVCj.E8uw0.ncn9......G....k1.
.....AQxcz1.......kz.wzzz1.U..6......M1...EB.........c3....F....6/...I1.....SFL0
..UU4W1KEyzlciszsU3YzTAe906.2s..zzSi...Fbf24LNyD4Ak5eP./cz1..........2.28.kFrA0.
.Ub96aAIVz9.1se7Umvxz0........../EU0.wzzz1...........s/...................E.2c..
zzzz.............0...................2./8.kzzzD...........EA....................
/EU0.wzzz1...................................wjoG1.E./2EexkNNqC../2E.3m5U08c..2E
./oSi.8cU0.E./2EFonzTz9../2E.VSGU08c..2E./2zJ/8cU0.E./2Ez4Kd/LD../2E.VQPU08c..2E
./okulfrS1.E./2E...cU08czz/cU08cyz1cU08cxz3cU08cnAX9e/rN........................
E....A....k.....I....w....EE0x4SElKMoZaPppaE..........................k/.MU/4...
.ok.1Ak.0.UaNaNaNaN..1........yDbNaNaNaNiz1.....................................
...................................wz...........................................
.....................2.....3....A....AYQjBrQ0ZaFjl4N............................
.....MU/4MU/4........AnAnAnAnQ.EOaNaNaNalz1....................E................
........................................................kz1........0./..........
................................/....E/..../....T7LNXZ4QmxqMVl4Kn64.............
..........U3K...................rX0LD8Qx6zHQxckpX0Ltz.........zD........kz1.....
................................................................................
............................................}